
Is your saxophone neck cork looking a little sad?
Do you want to save some money and change it yourself?
I love helping musicians learn how to care for their instruments, and this is one saxophone repair item anyone can do.
I’ve got you covered in today’s guide, so let’s dive in!
Table of Contents
What You’ll Need To Replace A Saxophone Neck Cork
These are the items you’ll need to get this done. You may have some of these items at home already!
- Heat source
- Small chisel or flathead screwdriver
- Cleaning cloth
- Adhesive remover
- Painter’s tape or electrical tape
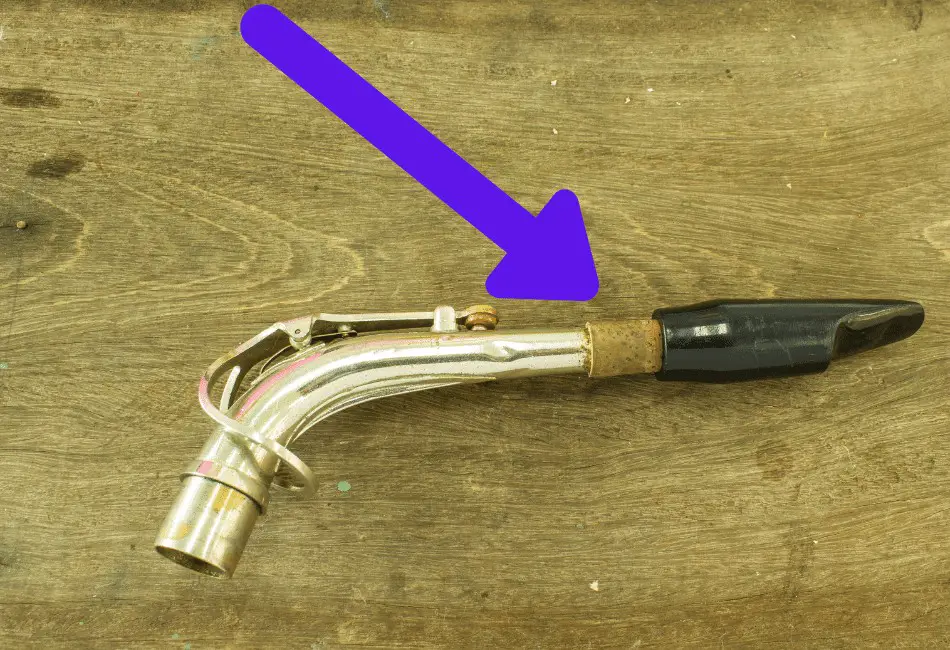
- Neck cork*
- A strong adhesive such as contact cement (optional)
- Box cutter or knife
- 220 Grit sandpaper
- 320 Grit sandpaper
- Cork grease
*This cork product is self-adhesive, which means you can peel one side to stick on. A regular sheet of cork doesn’t come this way. If you use another cork, make sure you also purchase glue and follow those directions.
Disclaimer: Some links may be affiliate in nature, which means we earn a small commission at no extra cost to you. Thanks for supporting the Dynamic Music Room!
Video On How To Replace A Saxophone Neck Cork
Step By Step Replacing Saxophone Neck Cork
#1 Remove The Old Cork And Clean
First, we need to get the old stuff off. Use your heat source to warm up the adhesive underneath the cork.
You don’t have to do this, but it makes the job 100% easier.
Once the glue is warmed, the cork may be scraped off gently using your scraper or flathead screwdriver.
Be careful not to push too hard, or you may damage the instrument.
Make sure every piece of the old cork is removed.
Again, this is fine to do without a heat source, but it’s much easier with one.
Warning: Use your best judgment when using heat. It shouldn’t take much to loosen the glue, but too much may damage your instrument.
#2 Remove As Much Adhesive As Possible
Take this time while the neck is hot, and right after scraping to use a paper towel or cloth to wipe as much of the old contact adhesive away as possible.
Doing more now will help in the next step.
When wiping, take care you wipe down toward where the mouthpiece is put on (the end of the tube) and not toward the lower part of the neck.
You want to avoid getting glue on the lacquer protecting the rest of the neck, as this may make your instrument more vulnerable to oils and environmental factors.
#3 Let Cool And Remove The Rest Of The Adhesive
Let the neck cool if you used a heat source; otherwise, prepare to move on.
Now, we need to remove all evidence of the old contact adhesive.
While it’s possible to do this with another scraper and sandpaper, I don’t recommend it. If you do, make sure you use painter’s tape to protect the lacquered part of the instrument.
You’ll have a much better time if you use an adhesive remover such as the one we linked to above.
Put a few drops on a paper towel or cloth and then rub it away. The chemical will dissolve the glue, making it come right off with little effort.
#4 Use Painter’s Tape
If you haven’t already, put tape around the lacquered part of the instrument. You don’t want the glue or adhesive to pull and wear on the protective finish of the rest of the neck.
Avoid contact by protecting it with the tape.
#5 Test The Alignment
Before removing the protective backing or using your stronger glue, make sure you check to see how you plan on lining up the edge.
The glue used in the cork strip we recommend and in other options is strong. Once the edge is on, it’s stuck.
Make sure you know how you want it to wrap around and be straight on the saxophone neck.
Note: If your neck has a tone ring or small lip on end, don’t put the cork over it, and don’t sand, glue, or do anything to it.
#5.5 (Optional) Use your Glue
If using contact cement or another strong adhesive (which is fine even with a self-adhesive option for a strong contact), put it on now.
You don’t want multiple layers, but make sure every surface is covered evenly according to the specific product’s instructions.
#6 Stick It On And Trim
Starting with the seam on the underside of the neck, stick the cork on and wrap it around the neck.
Stop with about a quarter of an inch before the second end meets the first one you put down.
Take your knife or box cutter and trim away any excess cork above the neck, making sure it’s trimmed down to the metal tube opening.
Now, mark both ends of the overlap at the seam with your knife, getting it as close as possible.
Trim the overlap off with a blade and press the final end down.
#7 Press And Finish
Use something to help press the cork down firmly and make sure it sticks to every surface of the adhesive.
Take your 220 sandpaper and sand it down slightly to make sure everything is level and finished. Pay extra attention to the seam.
Now, switch to the 320 grit paper to make it nice and smooth.
Give the top edge of the cork a bit of a curve to make the mouthpiece slide on easier. This is called a beveled edge.
If you didn’t get saxophone-specific cork, you might need to spend more time on the 220 grit sanding to get it skinny enough for the mouthpiece to fit.
#8 Final Step
Use your heat source to warm up the cork slightly, even less than before.
Now, put your mouthpiece on the new bits. Let it sit there for a while.
This will help the new material adjust to fit your size of mouthpiece and stick to the adhesive even better.
After this point, stick some cork grease on to help the mouthpiece slide on even better.
Congrats! You changed the saxophone neck cork!
Many music stores will do this for you, but it may cost you some money.
Now you can save and take pride in your own work!
Want to learn saxophone online?
There are a lot of junky programs out there, but the Alto Saxophone Lessons For Beginners course on Udemy is actually really good! Check it out (and thousands of other options too).
