Are you looking for some tips on how to teach rhythm?
Do you want your students to develop rhythmically, but you’re unsure how to get started?
Rhythm is one of the building blocks of music, and it’s critical students learn about rhythm.
It’s usually one of the most straightforward elements of music to teach, but you still may want some tips for how to get it done.
I’ve enjoyed helping my students and other music teachers so much over the past 10 years, and I’m here to help you again.
Let’s get started!
Table of Contents
How To Teach Rhythm In A Nutshell
When teaching rhythm, first, you need students to have a strong understanding of the steady beat. Then, you develop the rhythmic concept around the beat and label long and short sounds with possible rhythm syllables.
Teaching Rhythm Step By Step
In this section, I’ll go over the broad steps for introducing and reinforcing rhythmic concepts.
This method reaches different learning styles, uses engaging techniques, and developing practical skills.
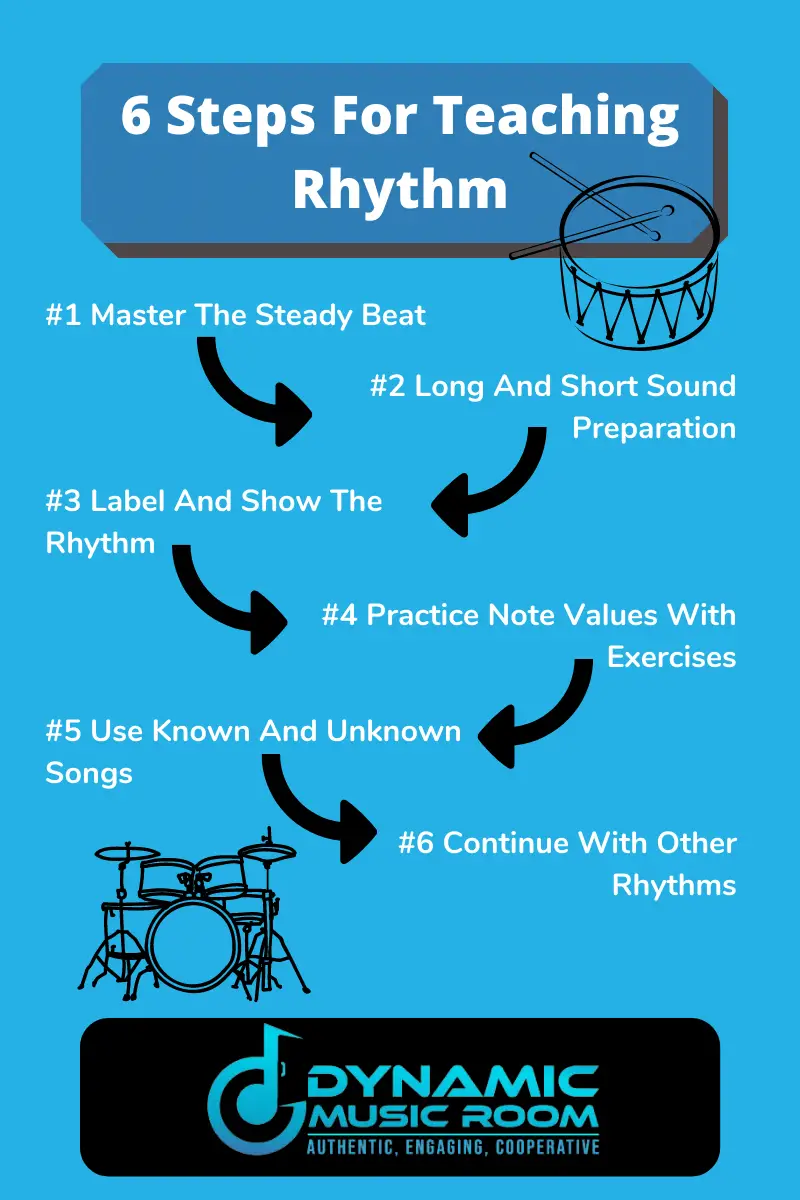
#1 Master Steady Beat
There is no rhythm without the steady pulse in music.
Don’t teach rhythm until the heartbeat of music is solid.
Cycle through kinesthetic, visual, and aural activities with different songs and pieces to reinforce steady beat.
Here are some quick examples:
Kinesthetic – Sing or play a recorder piece while the students match you in patting the beat on their laps and other parts of their body.
Eventually, you want them to do this with their eyes closed, so they find the steady pulse independently.
Here is where you may want to add some instruments such as drums or rhythm sticks.
Visual – Show pictures of hearts all the same size and equal in distance apart.
Discuss how the steady beat is even and doesn’t change.
Have students follow the beat on these shapes with their fingers.
Students may create their own steady beat shapes for tapping with their fingers too.
This is where a rhythm vs. beat worksheet may come in handy.
Aural – Students listen and move to steady and unsteady beats and can label them as such.
You may want to check out these popular songs with steady beat to help with reinforcing rhythms.
#2 Long And Short Sound Preparation
Now, we begin to move into preparation for basic rhythms.
Music educators of all methods agree you should put sound before symbol.
This means that music students should never attempt to master rhythms they haven’t first performed in songs or pieces.
Now, we’re going through the same activities as before (kinesthetic/movement, visual, and aural) but with rhythms.
Kinesthetic – Echo clap the rhythms from songs the students know well.
Students may also sing and clap the rhythms at the same time.
Visual – Put stars or another image on the hearts from the steady beat stage.
Discuss how the starts line up with the words.
These stars become the rhythm notation in the next step.
Students clap and follow the icons.
I’ve also done this with students in chairs where they are the rhythms, and the chairs are the beat.
You may also want to try beanbags inside hula-hoops.
Then, they can jump through the hoops as the rhythm beanbags tell you.
Aural – Students can hear your clapping or playing and arrange the pictures to match the rhythm you played.
This is a brief description of the step, and there are many more options out there, but hopefully, this gives you an idea of how to start.

#3 Label And Show Quarter Notes And Eighth Notes
When students have rhythms down solidly without looking at the notation for the note values, it’s time to label it.
I start with quarter notes and eighth notes.
I prefer to use the Kodaly rhythm syllables of Ta and Ti Ti.
You don’t have to by any means, but I encourage you to use rhythm syllables of some kind.
Check out my massive guide on rhythm syllables at the link.
It also has more exercises and activities for learning rhythm, including games.
In this step, all you do is connect the rhythms they’ve been preparing with the notation and syllable of your choice.
Then, you repeat similar activities from the previous step, now with the syllables and notation.
#4 Practice And Reinforce Note Values With Exercises
It’s here you move on to more complicated activities.
Here’s a sample of what I mean:
| Type Of Practice | Sample Activity |
| Echo | Echo longer and longer patterns using syllables. Challenge the teacher to see how long you can remember. |
| Read | Read longer and longer patterns faster and faster. Flashcards work well here. |
| Decode | Listen to the teacher’s rhythm, figure it out, and say it or write it back. |
| Writing | Write the rhythms in notation using pen and paper or manipulatives such as popsicle sticks. |
| Part-work | Perform rhythms in different ostinati. Body percussion works well here. |
| Compose | Create your own rhythms as part of a song and write it down. |
| Improvise | Create your own rhythms on the spot and with a steady beat. |
Worksheets work well with the writing and composing steps, but use them sparingly as they can get kind of boring.
#5 Repeat Step 4 With Known And Uknown Examples
Keep doing the same exercises as above with known songs (songs the students have done many times).
Make it all harder by using songs and snippets from classical works they’ve never heard before.
This is a true test of their understanding.
#6 Continue With Other Rhythms
After you do this, repeat the steps with new rhythms.
Usually, I go to quarter rest next, but the exact sequence is up to you.
Check examples of Kodaly sequences for more ideas on where to put sixteenth notes (subdivision of the beat), time signatures, and more.
This is the core of how to teach rhythm to your students.
Rhythm Learning Resources
Here are some of my favorite resources for teaching rhythm.
Some may be method books, while others are a series of exercises or tools for exercises.
Either way, I believe in these products and think any of them are an excellent purchase.
Disclosure: Links may be affiliate in nature, which means we earn a small commission at no extra cost to you if you click and buy. It’s a win-win, so thanks!
Conversational Solfege Flashcards – These flashcards are never a bad idea.
Plus, the rhythms are organized in a logical order your students will learn them, AND they’re pulled from common rhythms found in songs.
Lummi Rhythm Sticks – You’ve got to have rhythm sticks; they’re an easy and affordable way to perform rhythms.
These may not be too durable, but they are cheap, which helps any music teacher on a budget.
Together In Harmony – This is a combo method book that saved me when I was a new music teacher.
It’s a combination of Orff and Music Learning Theory, which means it does a good job of providing great music experiences in a grade-specific sequential way.
An American Methodology – This is a Kodaly method book, covering all sorts of concepts, not just rhythms.
But I find this particular method book does an excellent job with rhythm, especially the songs and activities.
Final Thoughts
I hope these teaching ideas on how to teach rhythm gives you a solid place to start teaching basic rhythms to your music students using practical exercises and examples.
Whatever you do will be just fine for your students as long as you do so with intention.
If I had to nail down the essential advice on this topic, I’d say these two things:
- Sound before symbol. Connect rhythms to songs and musical pieces as much as possible and always have the experience before the notation.
- Use different learning styles. Cycle through activities accessing kinesthetic (movement), visual, aural (hearing), social (cooperative learning), and creative/composing.
If you do these two things, you’ll be shocked how quickly they learn rhythms and develop great skills to read, perform, and create them.

