Are you sick of looking at confusing recorder note charts with no practical explanation?
Handing someone a full fingering chart for a soprano recorder and telling them to have fun is only so helpful. Without an accompanying explanation or skill, it won’t do much for the player.
After seeing all the other charts out there, I realized they didn’t help the beginner. They were unclear and too complicated.
This is why I worked to make my own soprano recorder fingering chart for beginners.
This article looks to share the chart and offer answers and explanations to questions related to this.
Hey! If you want to get better at the recorder, check out this course on Udemy.
I tried it out to see if my students would get something from it and, wow!, I was impressed.
Table of Contents
Recorder Note Chart

How Do You Read A Recorder Finger Chart?
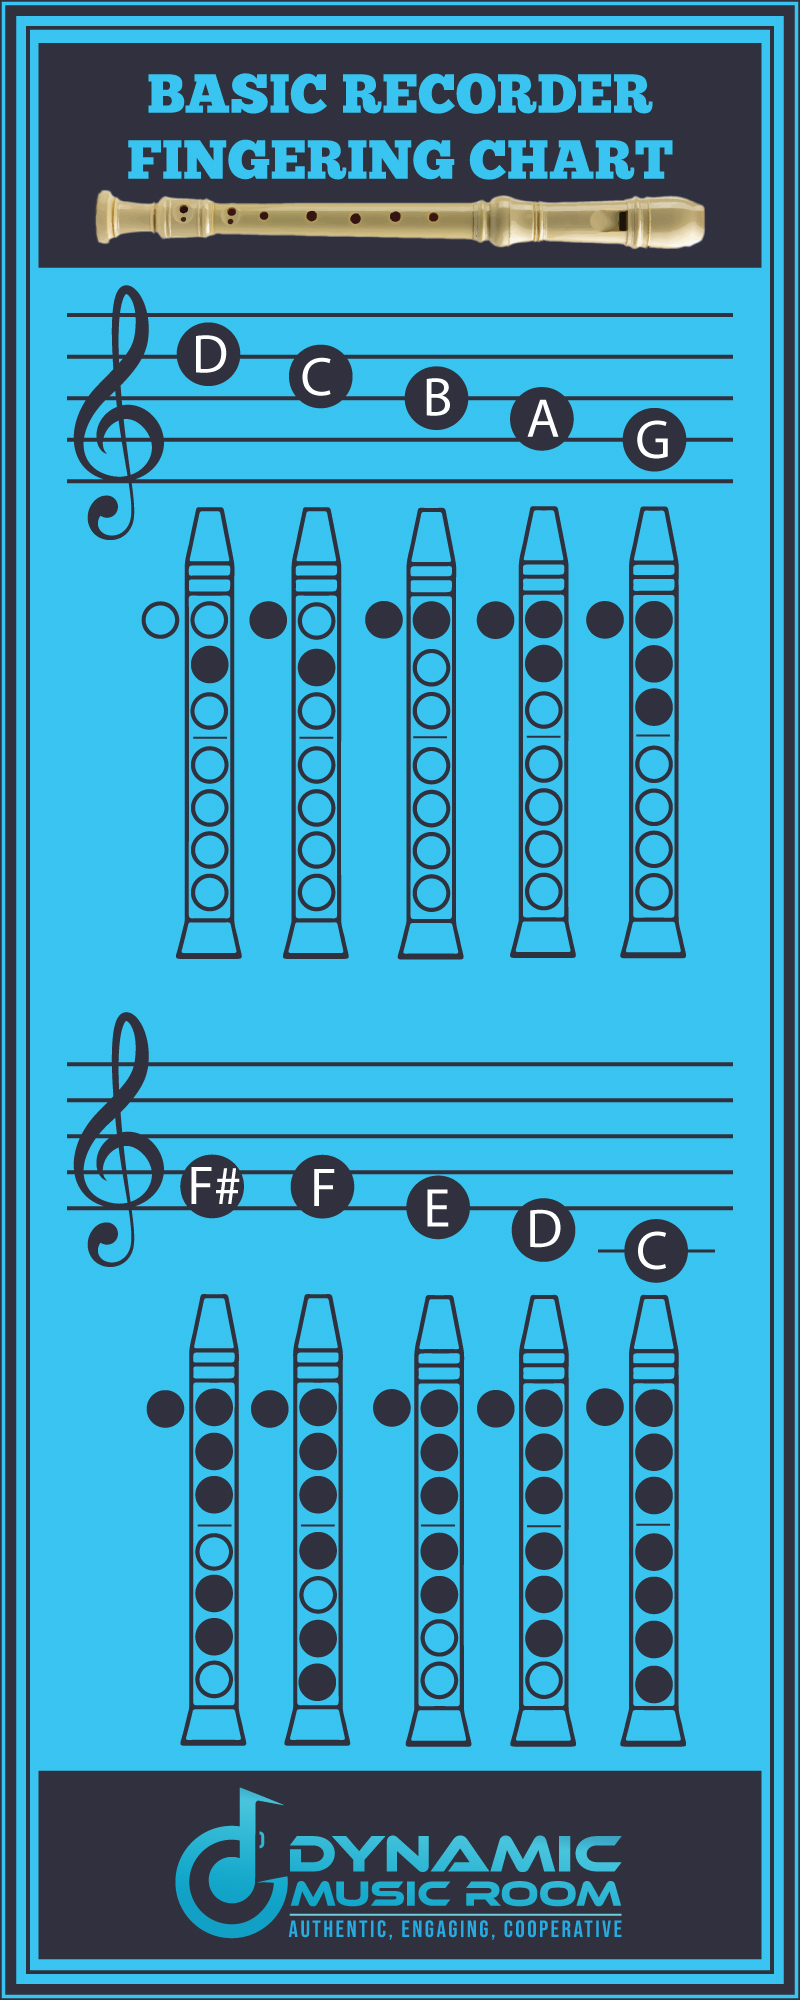
It’s nice to see the easy recorder song fingering chart above, but how do you use it?
This section offers an explanation on how to use the chart and figure out the fingerings based on the image. The next section offers a written explanation of how to finger the notes one by one.
Use both to help you learn how to play recorder notes.
Yes, most recorder makers do offer a fingering chart, but it’s often too complex and hard to read.
This is where my guide came from.
Find The Note
First, take a look at the sheet music you’re trying to play. You’ll notice each note has a note head or circle on the staff (those five lines).
These note heads tell the musician what letter name the note is. It doesn’t matter what the stem (lines) are, and it doesn’t matter if the note head is empty (as with half and whole notes) or full (quarter notes and smaller).
Wherever the note head land,s is the note name.
Notice if the note head is on a line or space and which one it’s on.
Go to the recorder fingering chart above (or printed off) and find the same note on the staff.
Below the note on the staff is the graphic of how to finger the note.
Reading The Circles
You’ll see 8 different circles on the image.
The circle off the to the left of the recorder represents the left thumb hole for the left hand which is on the back of the recorder.
The top three circles on the actual recorder body are for the three fingers on your left hand, pointer, middle, and ring respectively.
And the bottom four circles are for the four fingers on your right hand, pointer, middle, ring, and little fingers.
At the bottom two holes on your actual recorder, you’ll see these are actually two small holes set inside one larger indentation.
This is for accidentals and semitones on recorders which are for more advanced playing. For the purposes of a beginner recorder fingering chart, you just need to treat this like one hole each and cover both of the tiny ones.
The open circles are meant to be uncovered; the darkened circles mean to cover the hole with the appropriate finger.
Example:
- You see a note in your music on the third line from the bottom of the staff.
- Match this on the chart. The note is B.
- The image has the side circle and the top hole colored in.
- Use your left-hand thumb to cover the thumbhole on the back and your left-hand pointer to cover the top hole.
- Done!
Want to learn more soprano recorder? I didn’t think there were any good online programs to get you started, but this one on Udemy is actually awesome.
My students (both the young and college-aged ones) thought it was helpful.
How To Play Recorder Notes With The Chart
Still, you may find it helpful to read the note explanations one by one.
In this case, I’ll represent the notes with the following fingering numbers and letters:
- Thumbhole; left-hand thumb = T
- First hole;
| Hole | Finger Used (always!) | Shorthand Letter |
|---|---|---|
| Thumbhole | Left-hand thumb | T |
| First hole | Left-hand pointer | 1 |
| Second hole | Left-hand middle | 2 |
| Third Hole | Left-hand ring | 3 |
| Fourth hole | Right-hand pointer | 4 |
| Fifth hole | Right-hand middle | 5 |
| Sixth hole | Right-hand ring | 6 |
| Seventh hole | Right-hand little | 7 |
Here is how play recorder notes aligned with the chart:
- High D = 2
- High C = T, 2
- B = T, 1
- A = T, 1, 2
- G = T, 1, 2, 3
- F# = T, 1, 2, 3, 5, 6
- F = T, 1, 2, 3, 4, 6, 7
- E = T, 1, 2, 3, 4, 5
- D = T, 1, 2, 3, 4, 5, 6
- C = T, 1, 2, 3, 4, 5, 6, 7
Struggling with low and hgh D? Read our dedicated note guide.
Commonly Asked Questions
What are the 5 types of recorders? – The 5 main types of recorders are sopranino, soprano, alto, tenor, and bass recorders.
The two most common of these are the soprano recorder (which this post covers) and the alto recorder.
Fingering pattern ideas are the same for all recorders, though the starting note changes every other recorder.
Check out the 5 types of recorders in our dedicated article.
What is the best recorder for beginners? – The best recorder for beginners is the soprano recorder. I do recommend plastic one for new players as they’re more durable and cost much less.
If you want a specific recommendation, the Eastar soprano recorder in plastic sounds great and lasts a long time. (Click to check price).
Is recorder hard to play? – Yes and no, but mostly no.
For anyone with any wind instrument experience of any kind, the recorder is a walk in the park. The toughest part for these people is learning the new fingerings.
For people who’ve never played any wind instrument before, they may struggle to get the mind working on air, tongue, finger, rhythm, reading, and etc all at the same time.
But the learning curve is lowest for almost any instrument, so it’s a great place to start.
Learn more about how to play the recorder.
How many notes are on a recorder? – For basic recorder notes (which the post covers), there are 10 notes. These cover the basic notes you’ll need to gain a good foothold on recorder playing.
Total notes for even advanced players? There are 26 practical notes, although many of them won’t be used commonly.
Final Thoughts
I hope you enjoy this soprano recorder fingering chart for beginners.
Remember these few important ideas, and you’ll be set on learning notes until the advanced level of recorder playing:
- The side circle is for the left-hand thumb on the back.
- Left-hand fingers take the top three holes.
- Right-hand fingers take the bottom four holes.
- The two bottom holes are actually double holes, but this doesn’t matter for new players; just cover them both.
Need some fun (NOT boring) songs for beginners on recorder? Check out this book of Easy Pop Melodies for Recorder. (Click to check price on Amazon.)
Hey! If you want to get better at the recorder, check out this course on Udemy.
I tried it out to see if my students would get something from it and, wow!, I was impressed.


