
Are you interested in learning how to play a recorder?
Do you have a recorder but you keep asking yourself, “how do you play recorder”?
Learning to play recorders is a fun and simple pastime that can open doors into many types of playing. It may not impress people like learning to play guitar or piano (check out our categories for more info), but it’s the perfect way to learn how to read music.
As a music teacher for over 10 years and a recorder player for over 20, I know how powerful it is to be able to play an instrument, and the soprano recorder is a great one to start on.
This is why I made this guide for learning how to play the recorder.
You learn to play recorder by using correct air, fingering, and practice skills. The air should be soft and focused, the tongue should be light, and the fingers should cover the holes completely. After this, it’s just a matter of practice and determination.
The rest of the article contains the following sections:
Table of Contents
Parts Of The Recorder
First, let’s look at the parts of the recorder.
Note: This guide focuses on the soprano recorder, but most of the information applies to all the types of recorders.
Standard recorders come in three parts:
- The head joint
- The body
- Foot joint
Head Joint
The head joint is the top of the recorder where you blow into. The curved part is where the recorder mouthpiece rests on your lips.
There’s a rectangular opening called the windway or window. This is where the air will be split to cause vibration.
In essence, the window is responsible for making the sound. This should never be covered up.
Body
The body makes up the majority of the recorder’s length. This is also where many of the holes are.
On the body is a single hole by itself. This is the back of the body, and this hole will be covered up by the thumb.
Important! The left-hand thumb will cover this hole. The left hand is always on top.
On the front of the body are 5 more holes.
The first 3 will be covered by the left hand’s pointer, middle and ring fingers. The pinky finger on the left hand isn’t used.
For the other two holes, you’ll use your right-hand pointer and middle fingers respectively. The right-hand thumb goes on the back of the body underneath the fourth hole.
Note: The thumb hole on the back is towards the top.
Foot Joint
The foot joint is the bottom of the recorder. Against popular belief, if you cover the very bottom of the recorder it will still play unless you cover up all the other holes.
However, covering the bottom will change the sound slightly and make it go out of tune.
The foot joint has four holes in two groups.
The little holes are for playing half steps or semi-tones. This is advanced stuff; normally, you just cover both of the small holes in each group.
The right-hand ring finger covers up the top holes of the foot joint, and the pinky covers the bottom finger holes.
Check out the Eastar Soprano Recorder made of maple wood for a high-quality yet affordable instrument.
Putting The Recorder Together
Putting the recorder together is simple. The head joint fits onto the body.
You’ll know the top part of the body because the lone thumbhole on the back is towards the top.
When you place the body and head together, make sure the front of the body (the one with all the holes) lines up with the rectangular hole or windway on the head joint.
Attach the foot joint to the body after this. The top two holes on the foot should line up with the rest of the top finger holes on the body.
Note: You may notice the finger holes don’t line up exactly on your recorder. This is normal!
Your fingers aren’t all the same length, so the recorder makers shift the holes slightly to make it easier for your fingers to cover the holes.
Of course, this only works if your left hand is on top as it’s supposed to be.
How The Recorder Works
The recorder is a woodwind instrument. As part of this family, it makes its sound through splitting and vibrating the air.
As you blow through the mouthpiece on the head joint, the air comes in contact with a wedge inside the windway.
The wedge splits the air in two with some continuing through the recorder while the rest goes out in the air.
As the air is split, vibration is created which is the source of the sound.
When you cover the holes, you alter the length of the recorder and therefore change the length of the sound wave and the pitch.
As you cover more holes, the waves get longer and lower. As you lift fingers, the recorder gets shorter and plays higher.
This is similar to how the flute is played. In fact, the recorder and flute are members of the same specific family (though the recorder came first).
I guess you could title this article how to play the flute recorder, but it’s not called this commonly.
Check out this video for a more scientific explanation.
Posture And Position
With all of this in mind, it’s time to actually learn how to play recorders.
First, the posture and playing position.
Musicians should be sitting tall yet relaxed or standing up straight. There should be no tension in the body in this position.
The recorder forms a gentle 45° angle between your lips and the floor.
The arms come around loosely to hold the recorder. Your arms shouldn’t be held in to your sides nor pushed out like you’re flying.
The fingers from nice arcs to come down on the holes of the recorder. Don’t use flat fingers and don’t bend your fingers backwards at the knuckles.
Make sure your fingers are perpendicular with the recorder and not slanted up or down.
Your head should be looking straight ahead neither lifted up nor tilted down.
The mouth of the recorder rests on your lips with the tip of the recorder being covered by the thickness of your lips.
Your teeth shouldn’t touch the recorder ever. Imagine your lips are making a seal around the end of the recorder.
I tell my students their lips should make an O shape.
Air/Blowing Into The Recorder
With the proper posture, it’s time to blow into the recorder.
Your lips are blowing soft air with a circle shape.
Imagine you’re whispering the sound “too”.
Think about blowing a warm but focused stream of air.
Too hard, and the recorder will squeak and sound harsh.
Too warm and unfocused, and the sound will be weak and unclear.
Here are two quick exercises to try or think about:
- Light a candle or lighter. Hold the flame at recorder length from your mouth. Blow air sound (remember “too”) making the flame flicker but not go out.
- Blow some bubbles. Then, send the bubble across the room without popping it by using a focused stream of gentle air.
Tonguing
Tonguing is an issue of debate with many music teachers. There are two main schools of thought, and it revolves around which consonant sound to use.
Some teachers prefer the “d” in “doo” for the playing. They argue the sound is more gentle and encourages students to blow gently and squeak less.
Other teachers prefer the “t” in “too”. These advocates argue the sound is clearer and more in line with what tonguing techniques are used with more advanced wind instruments.
Which should you use?
It’s up to you. Try out both and decide for yourself.
I personally teach the T sound, and I know many other experienced teachers who agree with me.
However, there are just as many experienced and skilled teachers who use D.
Again, do both and decide which works best for you.
Fingering The Recorder
We’ve touched on fingering the recorder a little bit above.
The fingers need to be curved, not flat. Your fingers should be perpendicular to the recorder, not slanted.
When you cover the hole, aim for the hole to be in the center of your finger’s pad.
The left-hand thumb is assigned to the back thumbhole. The left-hand pointer, middle, and ring fingers cover the top three holes in this order.
After this, you switch to the right hand and cover up the next four holes with your right-hand pointer, middle, ring, and pinky fingers.
The right hand thumb just rests under the recorder in line with the fourth hole on the front side.
In general, the bottom two holes on the foot joint are doubled up, and you cover them both unless you’re playing more advanced half step or semitone notes.
How To Play The Recorder Notes
Different fingering combinations result in different notes.
This is the trickiest part of learning how to play a recorder instrument.
Learn the fingerings a few notes at a time, usually starting with B-A-G.
Use this chart to help you determine which notes on the staff are fingered in their own way.
Recorder Fingering Chart
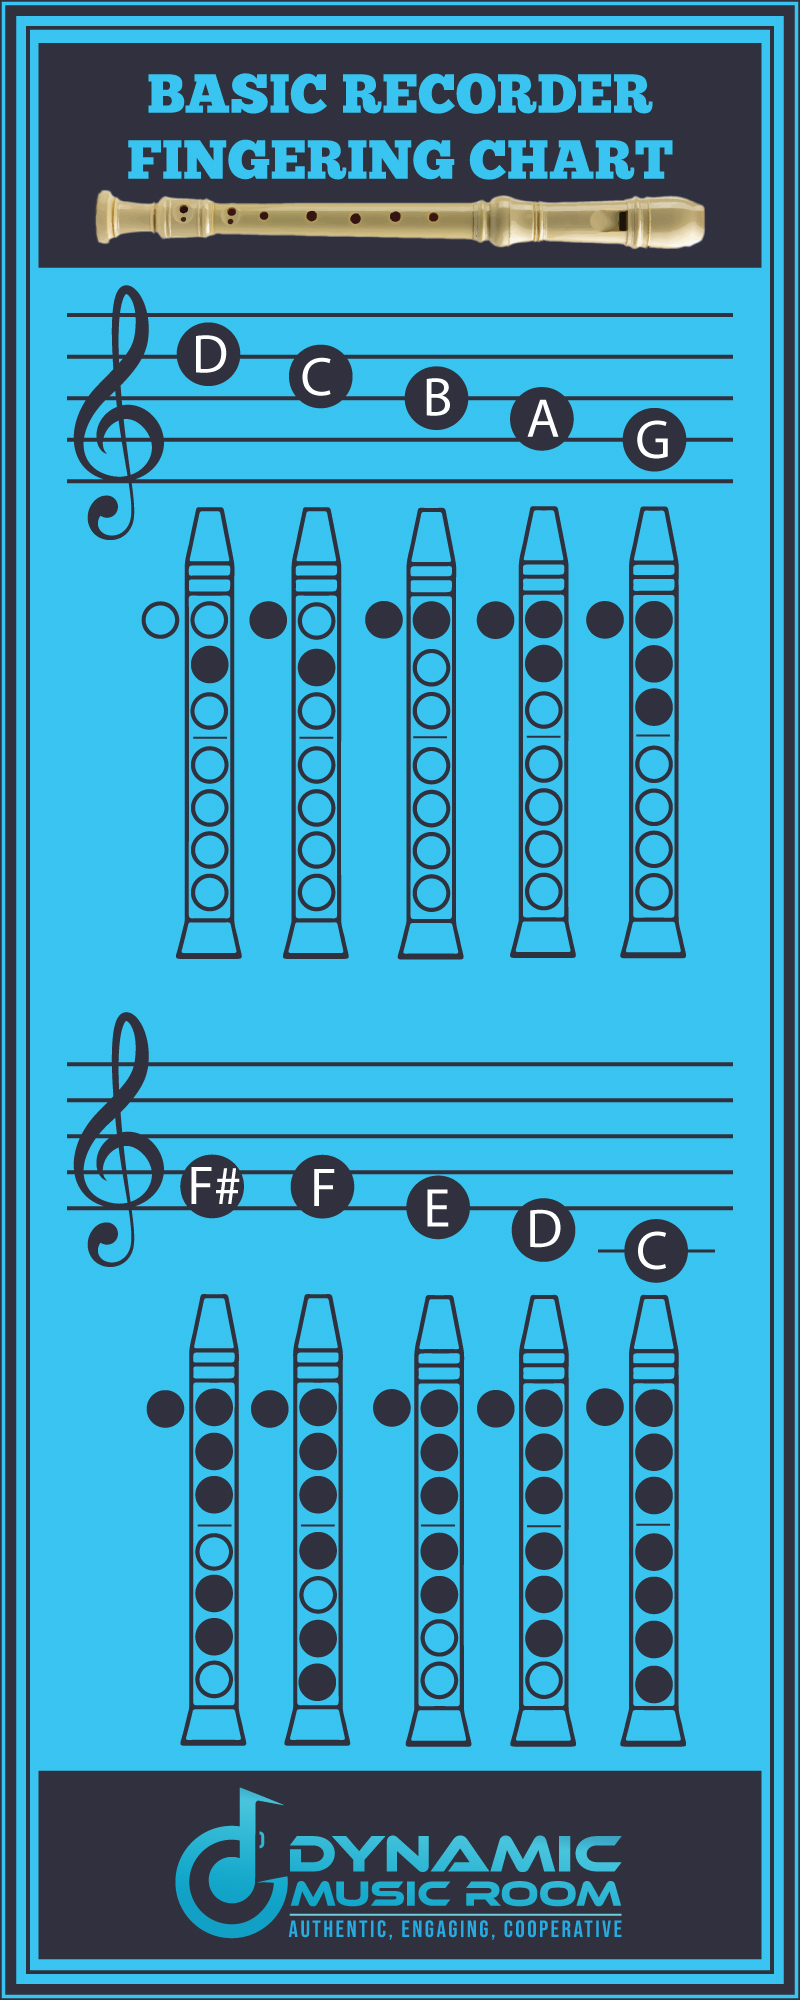
Note: These are the basic fingerings. More advanced fingerings such as semi-tones and “high” notes take more practice.
How To Play Recorder Songs
All this work towards in work on how to play the recorder would be useless if you didn’t learn some recorder songs.
It’s important to learn songs at your level. This is the way you improve without getting so frustrated you quit.
Here is the sequence I follow when learning a recorder song (and it’s the one I also teach to my students):
- Look at the notes, finger ones you don’t know
- Break the song down into smaller sections
- Review the rhythms of the section
- Finger the section (don’t play)
- Play the section
- Reflect on mistakes and practice again if needed
- Review rhythms of next section
- Finger the section (don’t play)
- Play next section
- Reflect on mistakes and practice again if needed
- Put the two sections together
- Repeat these steps with other sections until the song is learned
Here are some songs we break down for you on Dynamic Music Room.
Learn To Play Recorder By Practicing Correctly
One of the biggest mistakes people make when learning any instrument is practicing incorrectly. There’s a sort of marriage between science and art needing to happen to make a good practice session.
Use these tips to build good practice habits.
Good practice tips include:
- Block off short practice periods of 15-30 minutes 5 or 6 days per week.
- Shorter practices spread evenly throughout the week are better than a couple of long sessions.
- Stop practicing when you’re frustrated. But make sure you come back to the part the same or next day.
- Focus on the parts you struggle with and practice those parts slow.
- Practice the elements in this order: Rhythm → Fingering → Play Slow → Play at speed.
- Play a tricky spot until you get it right 5 times in a row. Restart when you mess up.
- Focus on good sound at all times.
- Reflect on the Big 3: air, tongue, fingers
High Notes
For those who enjoy playing the recorder and find yourselves blasting through the easier songs, you may want to tackle some songs using the high notes.
High notes on recorder are those above the D on the fourth line from the bottom of the staff.
The reason these notes are separated from the rest is because they used a special technique to play called “half-holing”.
Essentially, it works like this:
- Finger a lower note such as E (see recorder fingering chart above).
- Half cover the thumbhole instead of fully covering.
- Play with a slightly more intense and more focused air stream.
- The note will pop up the octave to become the higher version of itself.
Check out how to play high E on the recorder for a detailed guide.
Adding Vibrato
Vibrato is the gentle pulsation and slight warbling of a pitch to add some color and beauty to the tone of the instrument.
Singers and instrumentalists use it to different degrees depending on the style and instrument.
Traditionally, the flute (and by extension, the recorder) uses vibrato heavily.
For the recorder, good vibrato is created by a gentle pulsating of the air as you play. The exact way to do this is up to you.
Play around with the sound and find the one working for your play style.
Here are a couple of ideas to mess around until you find the vibrato blend you like:
- Pulse the air from your throat as you play
- Move your fingers slightly as they hold the recorder
- Pulse your tongue in your mouth
- Move the air from your diaphragm
- Pulse from your lower lip
Some of these ideas may not work for you, but experimenting with these will give you an idea of how to create the sound you want.
Then, pick the one you like or develop your own way.
Caring For Your Recorder
Though you may now have the basics for playing recorder down, you need to know how to care for your recorder to make sure it keeps working. This section gives you some basic information on this.
Cleaning The Recorder
Cleaning the recorder is important for stopping the spread of germs and keeping the recorder functioning correctly.
These directions are more for the common plastic recorders, but these will also work with the wooden recorder.
The main difference is the wooden recorder shouldn’t be kept wet or soaked but wiped off instead.
Here are your cleaning choices for plastic recorders:
- Spray down the mouthpiece with an instrument cleaner; then rinse.
- Hand wash with warm water and soap.
- Put in the top rack of a dishwasher.
Whatever you choose, you should follow up with a recorder cleaning and cloth. Wrap the cloth around the rod, insert into the recorder, and twist slowly as you pull it out.
Instrument cleaners work the best and easiest. My favorite is this Instrument Clinic cleaner (with brush and polishing cloth).
Do this at least once per month, and make sure you clean every time you get sick.
Here is a more detailed article on how to clean a plastic recorder.
Storing The Recorder
For plastic recorders, your only concern is keeping the recorder somewhere it will break or get scratched. They’re pretty tough (this is one reason why they’re great for young students).
With wooden recorders, you need to take a little more care.
The wood material is sensitive to humidity and temperature changes. Keep the recorder in a place where both of these elements are stable (not in your car or locker; I’ve made this mistake!).
Repairing The Recorder
Fixing recorders are a tricky area to look into.
If you’re using a plastic recorder, there’s not much to fix, and the price is generally lower. It would probably be easier to just buy another one.
For those with wood recorders, there aren’t easy fixes. We recommend reaching to the maker of your recorder and seeing who and what they recommend.
Conclusion
I hope you enjoyed this guide on how to play the recorder. It’s not difficult to learn how to play a recorder if you stick with it and use the correct playing technique.
Soft air, light “t” tongue, and fully-covered finger holes are essential for playing a recorder. Now that you know a little more about it all, take the time and go practice.
I enjoy the Recorder Guide. It’s great for all sorts of players. Check it out by clicking the link.