Are you starting your students on recorder?
Have you never taught recorders before and you need somewhere to begin?
I’m starting my third-graders on recorders soon, and when I do, I always go over how to play Hot Cross Buns on the recorder for beginners.
Helping beginners learn how to play Hot Cross Buns on recorder is simple. Begin with teaching them proper posture and air control, then teach them B A G, and finally help them learn the melody.
Read on for answers to commonly asked questions and directions on teaching Hot Cross Buns.
Table of Contents
Why Play Hot Cross Buns?
I think all music teachers wonder why we teach Hot Cross Buns as the first song for almost all instruments at one point or another.
The reasons may seem obvious, but here is why I teach Hot Cross Buns to my kids:
- Uses only three easily accessible notes
- Rhythms are simple and catchy
- Melody is largely descending making it easier to play
- It’s almost a rite of passage at this point
- Harmonies can be added easily
- Fits with the rhythms and pitches in solfege students at this age often already know
How Do You Hold A Recorder?
Holding a recorder may not seem tricky, but students do it wrong all the time. There are some common mistakes kids make, but these quick steps may be helpful holding it correctly.
- Rest the mouthpiece of the recorder on your chin with the window (small rectangle hole facing out).
- Take your LEFT hand and place your thumb on the lonely thumb hole on the back.
- Your pointer, middle, and ring fingers on the LEFT hand hover over the first, second, and third holes on the top.
- Take your RIGHT-hand thumb and place it on the underside of the recorder opposite of where the fourth and fifth holes are.
- Your pointer, middle, ring, and pinky finger on the RIGHT hand should hover over the fourth, fifth, sixth, and seventh holes respectively.
- The recorder should form a gentle slope as it points down towards the ground (around 45° with the ground).
- Players should be sitting up tall with their arms hanging comfortably.
- When fingers come down to play, they should be perpendicular with the recorder. Angled fingers have a harder time covering the holes.
- The thick finger pads (not the tips) should be the part that covers the holes.
You may also find it helpful to check out this video.
What Are The Notes For Hot Cross Buns On A Recorder?
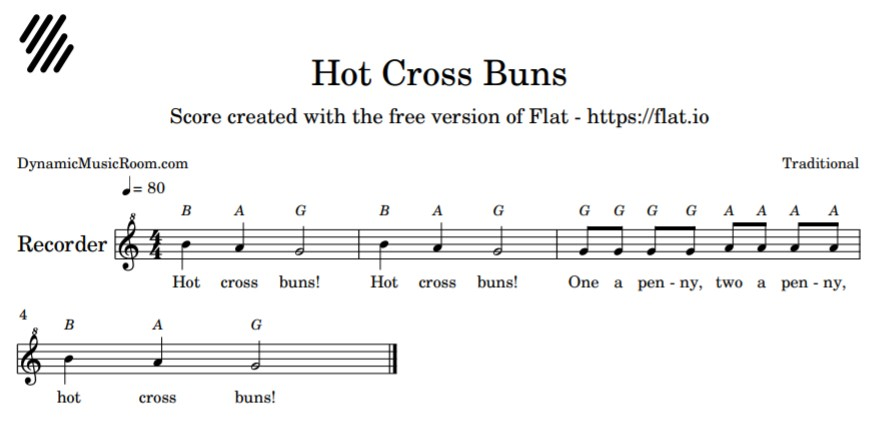
The notes for Hot Cross Buns are recorder are B, A, and G.
Look in the next section for the notation of Hot Cross Buns.
Here is a brief description for how to finger the notes B A G. This description includes the exact wording I use when teaching kids how to finger the notes.
How To Finger B – Take your left-hand thumb and cover the hole on the back of the recorder.
Now, take your pointer on the same hand and cover the top hole on the opposite side.
It’s almost like you’re pinching the recorder between your fingers. This note is called B.
How To Finger A – Show me a B. It’s thumb and pointer or thumb and 1 for those of you that forgot.
Now, you’re going to add the next hole by covering the second hole on the top with your middle finger.
You should now have left-hand thumb, 1, and 2 covered.
Be careful not to just cover the second hole. A must have both holes covered.
How To Finger G – Show me how to finger A. It’s thumb, 1, and 2 if you forgot.
Next, you’re going to use your ring finger to cover the third hole for G.
Hint hint! The more fingers you add, the softer you need to play.
Also, watch out as you add fingers that you cover the holes entirely. If you need to very gently squeeze the holes to make sure they’re covered, that may be a good idea.
Notice, I used the word “add” when describing how to place fingers. Some students will try to switch their fingers, so you’ll need to watch for that.
Make your own easy-to-understand recorder fingering charts by using these Recorder Dude products.
How To Play Hot Cross Buns On A Recorder Step By Step
In this section, I’ll go over the step-by-step directions I use when teaching Hot Cross Buns on recorder to beginners.
#1 Teach How To Hold The Recorder
The first thing you need to do is teach or review how to hold a recorder correctly. Check out the section above for more details, but here is a brief checklist:
- Left hand on top
- Recorder at 45° angle
- Right-hand thumb between the 4th and 5th holes on the underside of the recorder
- Fingers hovering over the holes
- Sitting or standing straight
#2 Practice Proper Air And Tonguing
To create good tone on recorder, students need to use the correct air and tonguing.
Entire articles could be written on this (and they may be later), but here are some sample points I make when teaching.
- Make a circle with your lips and whisper “too” or “doo.”
- Copy teacher patterns as they whisper some rhythms on this syllable.
- Hold your hand flat about one recorder length away from your mouth. Whisper into your palm. You should barely feel the air tickle your hand.
- Imagine (or actually do this) you’re blowing a bubble across the room without popping it.
- Imagine (or actually do this) you’re trying to make the flame from a candle flicker without blowing it out.
#3 Teach The Note B And Practice
With proper holding, air, and tonguing, we’re ready to play a note. (Look above for details on how to finger the notes).
Left hand thumb on the back and pointer finger on top of the first hole. This is B.
Students echo the teacher as they play patterns on B.
Offer feedback on air quality, hole covering, and listening.
#4 Teach The Notes A And G And Practice
In a similar manner above, practice the notes A and G and practice those notes.
You may need to give more feedback on hand position and covering holes with these notes.
#5 Echo B A G (Play It Twice)
Practice moving between B A G while singing the letters. Do B A G twice as the first two measures of the notation below shows.
Do it first by saying and fingering, and then try playing.
#6 Four Gs and Four As
Once the above section sounds recognizable, have students play 4 Gs and 4 As the notation below shows.
Like before, start with saying and fingering, and then add playing.
#7 End With B A G
Tell students to end with one more set of B A G as the notation below shows. This step should be easy as they already did it twice in the earlier step.
#8 Say And Finger It All Together
Now, comes the time to try it.
I always have students say and finger at least twice before they try to play the entire song.
You may want to write the notes on a board or show the notation to help them remember it.
Pro-tip: Ask students to say and finger while you play it. This will give them a chance to hear what a good recorder sound is like when playing a song.
#9 Try To Play It
Have students play the whole song!
Don’t be surprised if there are mistakes. This is a lot of new information.
#10 Practice Until Mastered!
Practice the song slow. Break it down and focus on the trouble parts.
Make half the class play while the other half sings the notes and finger along.
Get creative in the ways you have them practice until they play the song well and with confidence.
Now they know how to play Hot Cross Buns on recorder!

Commonly Asked Questions
What is recorder karate? – Recorder karate is a reward-based system using sequentially harder songs for teaching recorder.
Students are tested on these songs and awarded different belts.
Since the recorder karate system released, many other programs have begun to include their own reward levels.
Those interested in Recorder Karate Methods should check out the book.
What recorder curriculum should I use? – You should use the one you’re most comfortable with and fits your teaching style and time available.
I personally follow the Be A Recorder Star method.
But you can follow your own too. My friend Melissa Stouffer didn’t like any systems out there, so she made up her own based on Kodaly-inspired teaching.
What are the 5 types of recorders? – The five types of recorders are:
- Sopranino
- Soprano
- Alto
- Tenor
- Bass
Conclusion
I hope you found this guide for how to play Hot Cross Buns on the recorder for beginners helpful.
I’ve taught it this way for over 10 years now with the goal of making students feel as successful as possible. But this is just my way.
How do you teach this song? Let us know in the comments.


