
Are you a new recorder player struggling with the note F?
Does the notes F on recorder just not sound right to you?
Don’t feel bad; you’re not alone!
In my years of teaching music and recorders, people always seem to hit a major roadblock when it comes to learning how to play F on recorder.
Playing F on recorder is tricky because of the difficult fingering and how it’s the first descending note to use the right hand. Focus on the correct fingerings and practicing the coordination to play, and you’ll learn it in time. You play F on recorder by covering:
- Left-hand thumb
- Left hand 1, 2, 3 on the top 3 holes
- Right hand 4, (skip 5), 6 and 7
Look ahead for explanations, a sample song, and a basic recording fingering chart.
Table of Contents
Do You Mean F Natural Or F#?
The first thing you need to think about when looking at a song with the note F is whether you mean F natural or F#.
These notes are only a half step apart, but they’re played completely differently.
First, check out the note and if it’s on the first space from the bottom. Is the note between the bottom line and second from the bottom line of the staff?
If so, it’s either F or F#.
Look at the note. Is there a little “#” in front of the symbol?
If so, it’s an F# (pronounced “F sharp”).
Look at the beginning of the staff. Do you see the little # on the bottom space of the staff?
If so, all Fs are now F#s.
If both are absent and the note is all on its own, the note is an F natural.
This post deals with fingering the note F natural. Look ahead for more details once you’re sure this is what you want.
Note: If the F is the one on the top line of the staff, it’s fingered the same as low F but with the half-hole technique.
Check out how to play the recorder for more info on this technique.
How Do You Play F Natural On Recorder?
The basic recorder fingering chart below may be helpful to you, but in this section, I’ll walk you step by step through how to finger and play F natural on the soprano recorder.
First, be prepared to blow with soft but focused air. Make sure your notes are tongued as if you were whispering the word “too”.
Next, wrap your lips around the tip of the mouthpiece creating a seal. The recorder should form a 45° angle with your body and the ground.
Your teeth should never touch the recorder.
Your left hand should be on top (always, no, it’s not up for debate). The left-hand thumb covers the single hole on the back of the recorder’s body.
Your right-hand thumb rests on the back of the recorder either in line with the fourth hole from the top or between the fourth and fifth holes (but the thumb rests on the back).
When you cover the holes, they need to be covered completely. Aim for the middle of your finger pad to cover the holes.
Your fingers should be gently curved, not flat. The fingers need to be perpendicular to the recorder, not slanted.
The following holes are covered for F natural:
- Left hand thumb on the back
- Left-hand pointer covering the first hole
- L. hand middle covering the second hole
- L. hand ring covering the third hole
- Right-hand pointer covering the fourth hole
- NO MIDDLE FINGER ON THE FIFTH HOLE
- R. hand ring finger covering the two small holes at the sixth spot
- R. hand little finger covering the two small holes at the seventh spot
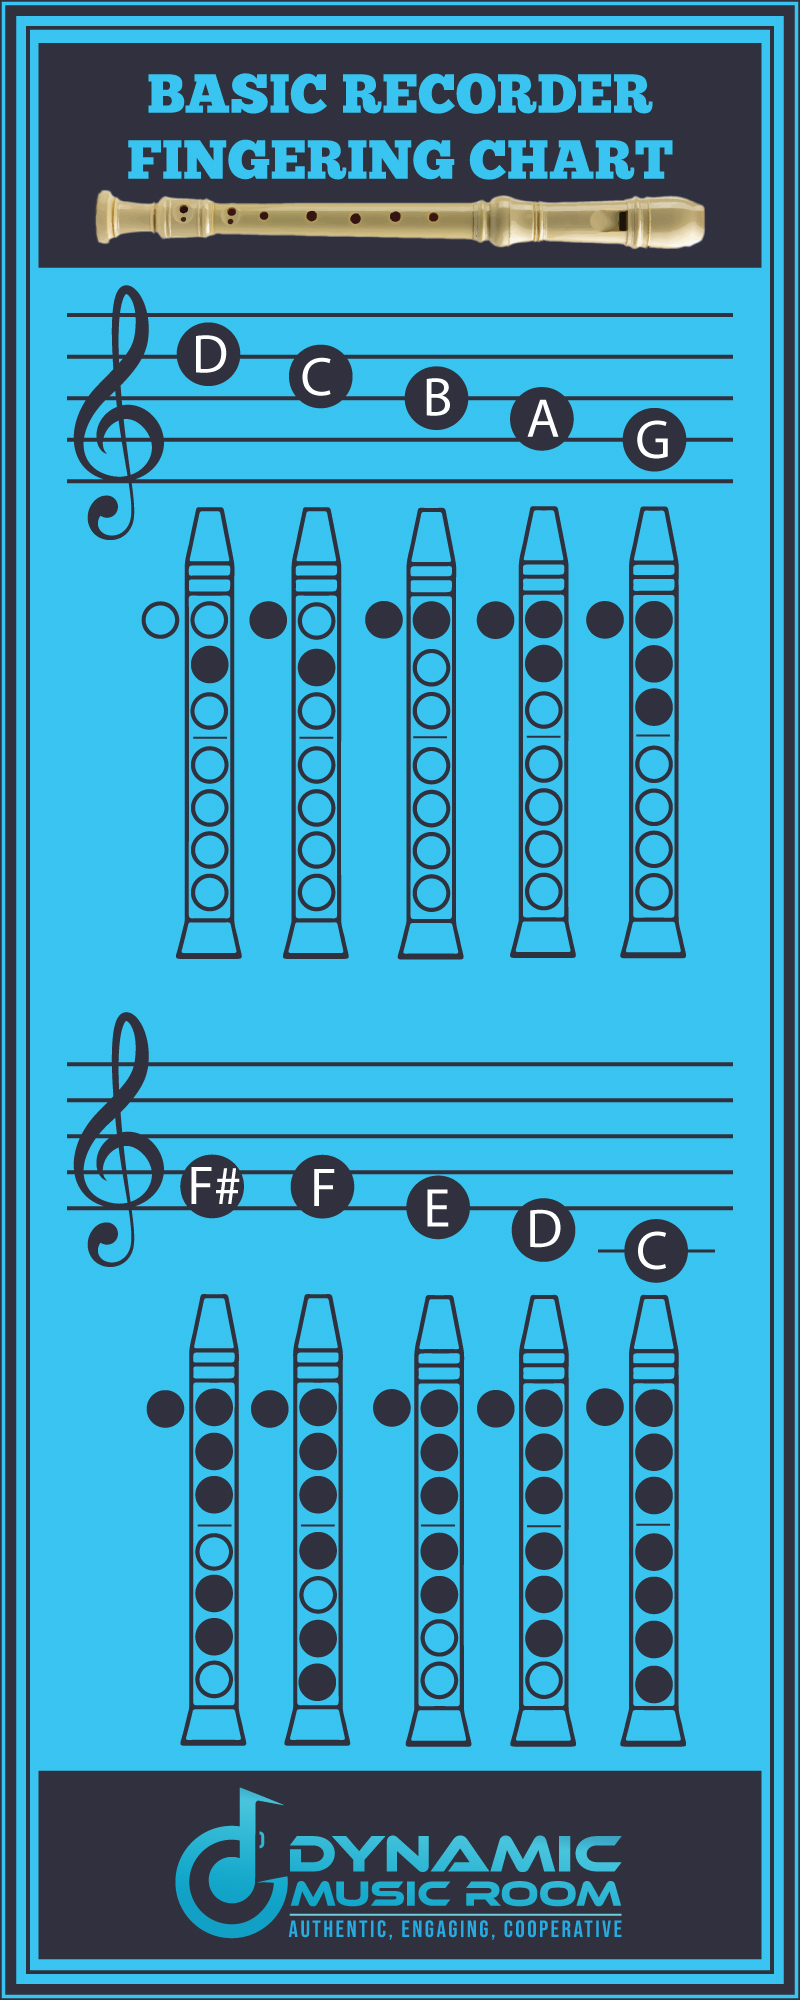
Basic Fingering Chart
Use this basic recorder fingering chart to help you get a better visual of how to finger F natural on the recorder.
Alternate Fingerings: Don’t Use Them!
There are a couple of alternates you may discover when playing an F natural. These sound close to correct and are easier to play.
Don’t use them!
These fingerings shouldn’t be used. Sure, it’s easier this way, but your notes are wrong and will never sound right.
Yes, it’s harder to do it correctly at first, but with effort, it won’t be difficult for very long.
These alternate fingerings include:
- Thumb, 1, 2, 3, and 4
- Thumb, 1, 2, 3, 4, and 6 (no 7)
Recorder Song With F Natural
One of the best ways to learn a note is to isolate a part of a song where the note is used a lot. For the note, F natural, the song My Heart Will Go On is an excellent choice.
There is a trickier Bb also in much of the song, including the chorus. For the purposes of practicing only the note F natural, let’s look at the verse of this song.

There are a few reasons, the verse of this song is perfect for practicing F natural.
For one, the melody is pretty slow and doesn’t use a lot of notes.
What notes are used is largely step-wise. This means the note F goes to its neighbors G and E.
This stepwise motion gives the player a lot of practice moving to and from this tricky note.
At the end of the phrase, you get a nice slow F-low C motion which is actually simple to play (all you do is add the middle finger on the right hand).
Check out our full guide on My Heart Will Go On recorder notes.
Conclusion
I hope you found this guide for how to play F on recorder helpful.
It’s tricky for many at first, but with focus on the correct fingering and practicing the coordination of using your right hand, it’s learnable by any age group.
Improve your recording playing by learning songs that provide you with a solid foundation. Check out these First 50 songs you should play on recorder books by Hal Leonard.
