

Do you want to learn a fun bluegrass song on recorder?
Are you looking for some help mastering one of the tougher recorder tunes used by many popular recorder methods?
Old Joe Clark is one of my favorite songs and games to teach to older students, and it’s also a great song to learn on recorder.
But many get stumped when starting to learn this song, so I applied my years of experience teaching to make this Old Joe Clark recorder guide.
Playing Old Joe Clark on recorder is tricky at first, but when you break it down in the right way, it’s not too hard at all. The main thing to focus on will be the turnaround playing A-G-F#.
Check out the rest of the post for more information.
You may also enjoy how to play the recorder.
Table of Contents
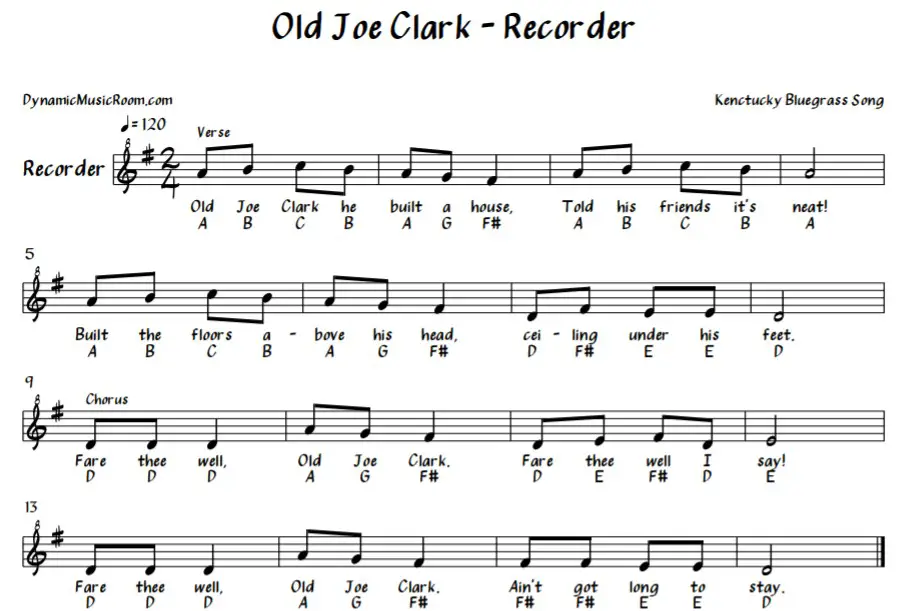
Old Joe Clark Recorder Sheet Music
Here is the sheet music for Old Joe Clark on recorder. Notice I put the common lyrics and the recorder letters below the notes as well.
You may also note that the rhythms are simplified for easier playing and reading.
Check out the next section for a breakdown of how to finger the notes.
There are several reasons this song is great for learning recorder.
- The song itself is silly and fun, helping the students stay motivated to learn.
- There is a lot of practice reaching the note F#. This is great for developing coordination and familiarity for the note.
- The rhythms are simple enough it won’t distract from the challenge of the note.
- With a wide range, the song stretches the ability to remember all the notes and keeps old skills sharp on notes they’ve already learned.
Old Joe Clark Recorder Notes
Here is a brief verbal description of the notes used in Old Joe Clark on recorder.
Keep in mind, the hole numbers 1, 2, and 3 are played with the pointer, middle, and ring fingers on the left hand respectively.
The hole numbers 4, 5, 6, and 7 are the pointer, middle, ring, and little fingers on the right hand respectively.
Holes 6 and 7 are actually double holes, and you need to cover both of the little holes.
The left-hand thumb is the thumb covering the thumbhole (can I say thumb any more in one sentence?).
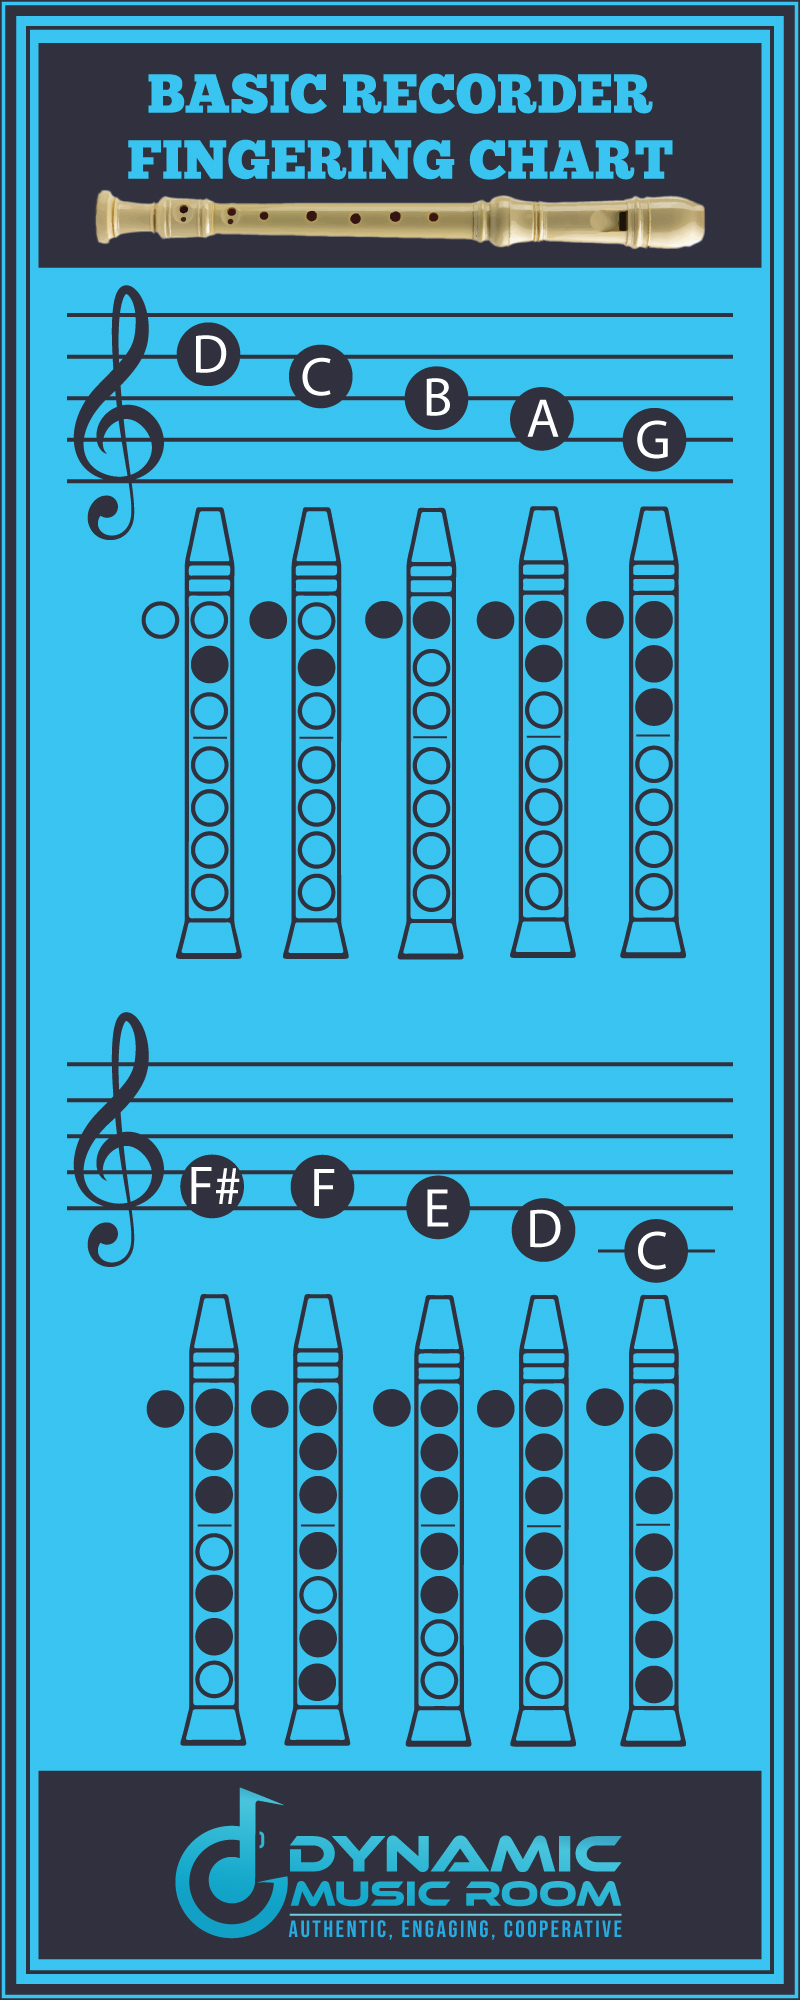
On the fingering chart (see below), the thumb is the hole just off the side of the recorder.
Here are the notes used in Old Joe Clark:
- High C – thumb, 2
- B – thumb, 1
- A – thumb, 1, 2
- G – thumb, 1, 2, 3
- F# – thumb, 1, 2, 3, 5, 6
- E – thumb, 1, 2, 3, 4, 5
- D – thumb, 1, 2, 3, 4, 5, 6
Old Joe Clark Tutorial
This section breaks down the steps to learning the song, Old Joe Clark, and the recorder notes.
Use these steps as a guideline for how to practice the song and use the sheet music above as a reference to play the old Kentucky song.
#1 Review The Notes On Their Own
First, you need to make sure you’re familiar with each and every note on their own.
Take some time to play each of the notes in several rhythms.
Again the notes are: C, B, A, G, F#, E, D
Try playing each note in different rhythms at least 3 times each.
Your goal in this stage is to make sure your fingers are comfortable with each note and create a good sound with each note.
When you feel ready, it’s time to look at the song.
#2 Learn The Verse
Whenever you learn a new song, you need to break it down, and then break it down further.
The song, Old Joe Clark, has two main sections: a verse and a chorus. The verse may be slightly easier for some, so we’ll start with the verse.
Take a look at the verse and say/clap the rhythm syllables.
Once this is done (it’s pretty easy in this song), finger the notes and say the letters slowly in rhythm.
Do this 3-5 times taking care to do it slowly enough you get each and every fingering right.
After you feel comfortable with this, play the verse. As you play, take note of parts where you mess up the most.
In my experience, most people are thrown off by the last two measures where the notes go F#-D-F#-F#-E-E-D.
Regardless, isolate and practice the spots where you struggle the most. Do this part slowly 3-5 times, and then put it back together with the rest of the verse.
After you’re able to play this at 90% correctness, move on to the next step.
#3 Learn The Chorus
The same steps apply to learning the chorus as does the verse.
Start with the rhythm, practice the fingers, play the chorus, reflect and fix mistakes, keep practicing to 90% correctness.
For most of my students, they mess up most on the D-E-F#-D-E part. Don’t be ashamed to slow it down when practicing.
If you can’t play it slow, you can’t play it fast!
#4 Put It Together
Repeat the same steps, but this time with the whole song rather than just individual sections. If you’ve done the work learning each section individually, this step won’t take much effort.
In my experience, it’s the students (adults or kids alike) who blow past learning the sections individually who struggle and get frustrated with the whole song.
Be patient, slow it down, and think about it.
You’ll get there, don’t worry!
Check out the All Star recorder notes and instructions on how to play.
Final Thoughts
I hope you found the Old Joe Clark recorder guide helpful to learning this tricky song.
Just break it down slowly and focus on learning the neighbor switches between G-F# and F#-E, and it all falls into place.
Learn more recorder songs and get really good on the recorder by following The Recorder Guide by Kulbach and Nitka.